

Man, I love Indian food. Give me creamy curry, saucy chickpeas, and spicy potatoes any day of the week, and I will die happy. But here’s the thing: making Indian food at home can feel like running a marathon in a spice market. You need twelve jars of things you can’t pronounce, a saucepan that’s not currently soaking in your sink, and a small miracle. And just when you think you’ve pulled it all together—bam—you realize you forgot the naan.
Now, let me be very real with you: Naan is not optional. It’s the warm, chewy, buttery scoop for your tikka masala. It’s the crispy-soft bite that balances heat with comfort. It’s the edible hug you didn’t know you needed. So store-bought? Nope. Not happening. Those taste like sadness and cardboard. And eating out? I’d love to, but my wallet is allergic to restaurants right now.
That’s why I had to figure out my own way. And yes—spoiler alert—homemade garlic naan is 100% worth the effort.
Before you panic and click away because you think this is going to be some four-hour ordeal with 15 rising steps and a tandoor oven, breathe. I got you. This recipe is simplified. It’s beginner-friendly. It’s a little hands-on, yeah, but it’s also so good I promise you’ll forget the time when you sink your teeth into that garlicky, golden, bubbly bread.
Let’s talk strategy.
The Dough Game Plan
First things first: this dough only takes about 10 minutes to mix together. No fancy mixer, no special flours. Just you, a bowl, some basic pantry stuff, and your two hands. It does need to rise for an hour or two, but this is the perfect moment to prep your main dish, do some laundry, or doom-scroll for longer than you should.
And if you want to make your life even easier? Mix the dough the night before, toss it in the fridge, and forget about it until dinner time. Cold dough works great—just pull it out about an hour before cooking to come up to room temp while you prep the rest of the meal.
Garlic, Butter, and Life Lessons
Garlic naan is next level. Once you’ve made basic naan, you’ll realize that adding a little garlic and butter isn’t just a flex—it’s a public service.
You’ll want to make a simple garlic butter while the naan dough is resting. I usually melt butter with a couple of cloves of minced garlic and a pinch of salt, then set it aside. You can add chopped cilantro or parsley if you’re fancy (I’m not, but I’ve pretended to be before).
Now, very important PSA: Do not start cooking your naan before everything else is basically done. I’ve made this mistake too many times to count. Naan needs your full attention for about 10–15 minutes of cooking—flipping, brushing, babysitting. It is not forgiving if you’re also trying to stir a simmering curry, plate rice, or referee screaming kids in the background.
Make your main dish first. Keep it warm. Then, and only then, begins naan duty.
Cooking the Naan
You don’t need a tandoor oven. You don’t even need a pizza stone. All you really need is a hot cast-iron skillet or a heavy-bottomed non-stick pan if you, like me, are not into the cast-iron scene.
You’ll roll out your naan into a rough oval—don’t overthink the shape. Rustic is the goal. The dough goes straight into a hot, lightly greased skillet. It should puff and bubble within seconds. Flip once, brush on that garlic butter, and boom. You’re basically a naan artist.
The first one might look a little weird. That’s fine. You’ll get better with each one. By the end of the batch, you’ll feel like a naan pro.
Leftovers & Other Uses
Honestly, I usually just stick these in a plastic bag on the counter. The naan can stay at room temperature in an airtight container or in the fridge for 2-3 days. If you won’t be able to eat all of it that quickly, it can be stored for a month in the freezer. Just reheat it in a skillet, microwave it, or pop it in the oven wrapped in foil.
Also, use this naan as a base for wraps, to-go breakfasts, pretty much any savory dish can be made a little better with Naan. It’s is more than just a side—it’s a lifestyle.
Final Thoughts
Look, I get it. We like our meals quick and easy over here at Stir&Chill. And I’ll be honest: this naan is not the fastest thing you’ll ever make. But when you think about how it elevates your entire Indian meal from “pretty good” to “this should be illegal,” it’s worth the little extra effort.
So next time you’re planning a curry night, take a deep breath, mix some dough, and trust the process. This homemade garlic naan is chewy, flavorful, buttery, and everything that store-bought isn’t.
And most importantly? You made it. Yourself. That’s something to be proud of.
Homemade Garlic Naan
Ingredients
Naan
- ½ cup warm water *For tips on getting the right temperature, see recipe notes.
- 1 teaspoon granulated sugar
- 2 teaspoons yeast
- ⅓ cup plain yogurt
- 2 tablespoons olive oil You can also use vegetable or canola oil
- 1 teaspoon salt
- 2 – 2½ cups all-purpose flour
Garlic & Toppings
- 2 tablespoons butter melted, salted or unsalted is fine
- ½ teaspoon garlic powder
- ½ teaspoon salt
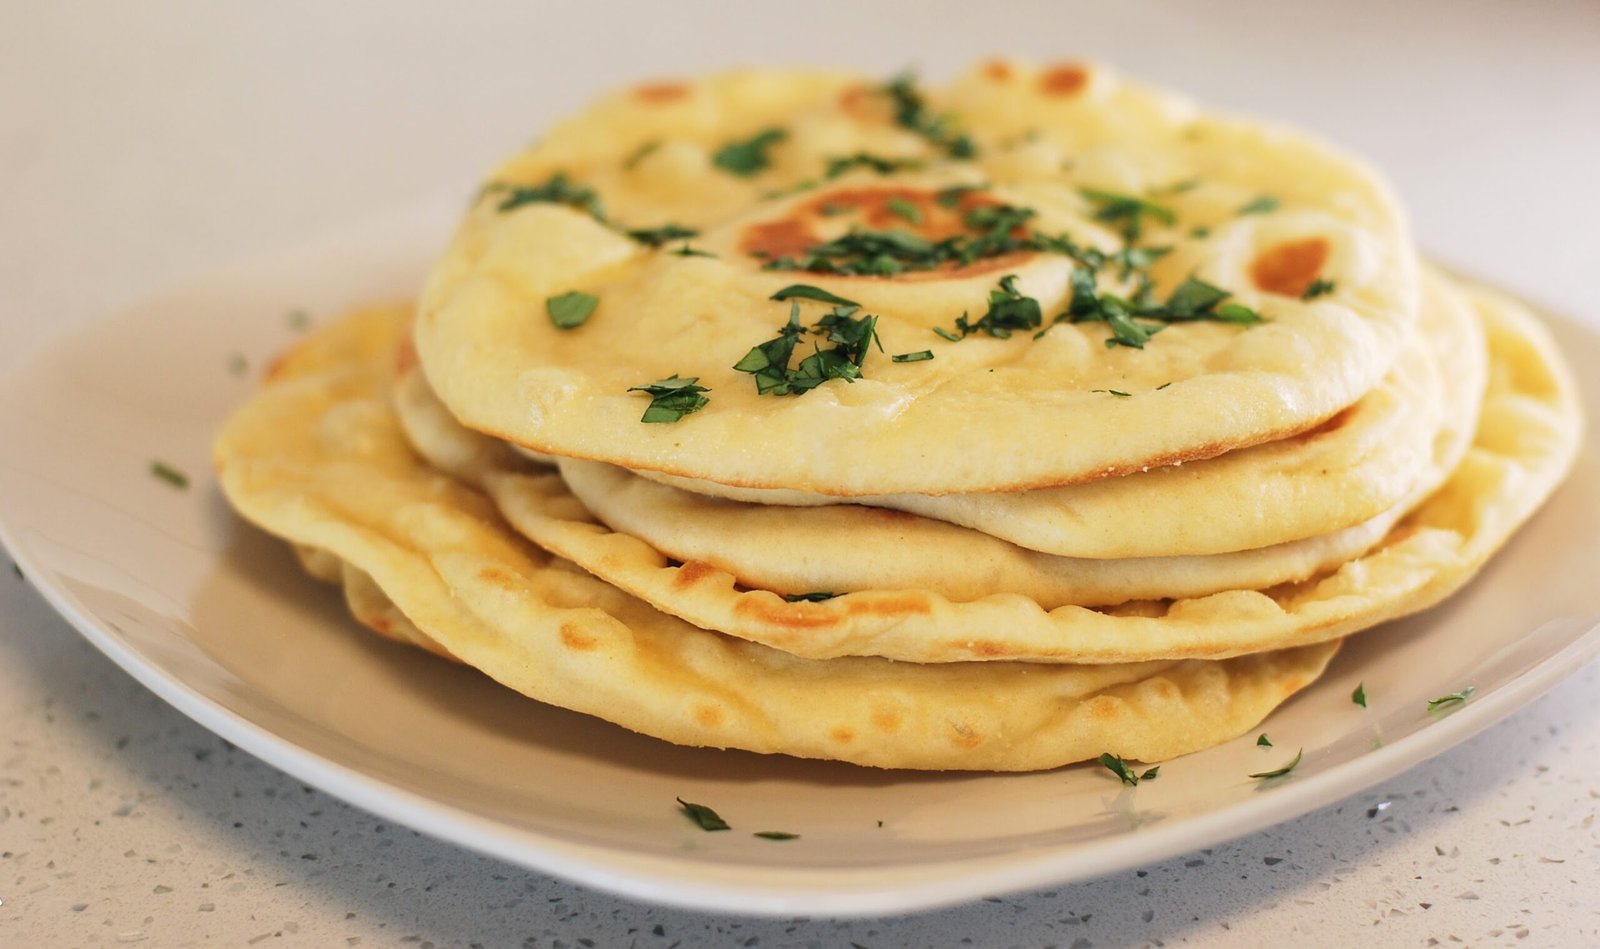
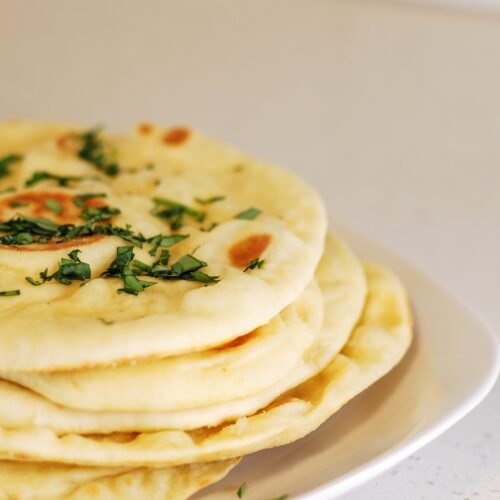
- toppings optional, but you can top it with fresh herbs like I did in the picture so it looks nice
Instructions
Making the Dough
- Stir ½ cup warm water, 2 teaspoons yeast, and 1 teaspoon sugar in a medium-large bowl. Then let the yeast mixture sit for ten minutes or till bubbly.
- Add 2 tablespoons olive oil, ⅓ cup yogurt, 1 teaspoon salt, and 2 cups of flour. Stir the mixture to the best of your ability until everything is moist and smooth.
- Add ¼-1 cup flour more so that the dough is soft and a little sticky, but manageable with your hands. Knead a few times in the bowl until smooth.
- Take the dough out to grease the bowl, then put it back in and give it a turn so that all sides are lightly coated in oil. Cover and let rise in a warm place until doubled.
Cooking the Naan
- Preheat a medium sized frying pan to medium heat. Cut dough into eight pieces (I usually just eyeball it). On a lightly floured surface, roll out each piece into about a 6″ circle (Each piece should be pretty thin, like ⅛ in. Honestly, I usually go a touch over 6").
- Add a little oil or non-stick spray to your frying pan. Cook each circle on medium-low heat for 2-3 minutes or until bubbly and golden brown on the bottom. Then flip the circle over and cook for another 2-3 minutes on the other side. While the Naan is cooking, melt your butter.
- Brush the top (bubbly side) of each naan with melted butter. I add garlic and salt to my butter, but you can just do the butter if you aren't feeling the extra work.
Notes
Activating the Yeast
- For happy yeast, you typically want the water to be around 105℉. Being 5℉ over or under is still good for the yeast, so don’t stress!
- I don’t like wasting water and waiting around all day for my water to heat up, I grab what I need from the sink and microwave it for 15-30 seconds. TA-DA! Warm water without the wasted time.
Rising Time
- You can usually get this to rise in about 30 minutes, but if you want to make this ahead of time (which I recommend) and have it rise for more than an hour I would pop it in the fridge, where you can leave it for up to 2 days. Just make sure to take the dough out 45 mins to 1 hour before you use it so that the yeast can get back to room temperature.
Cooking The Naan
- Honestly, this is the least chill part of this recipe. The process is a bit involved, and to do it quickly you have to roll out one piece of dough while another is cooking, so I would save cooking the naan for last when all the other parts of your meal are done or only need to be taken off the heat. Besides, warm naan is superior to cold naan. Sorry I couldn’t make this part easier, but from what I can tell cooking naan always takes work. If you are stressed about getting the size right, I would recommend getting a silicone pastry mat like the one I have. It makes measuring circles for baking MUCH easier. It’s a pain to clean, though, so flour well so that all you have to do is wipe it down!


Leave a Reply