


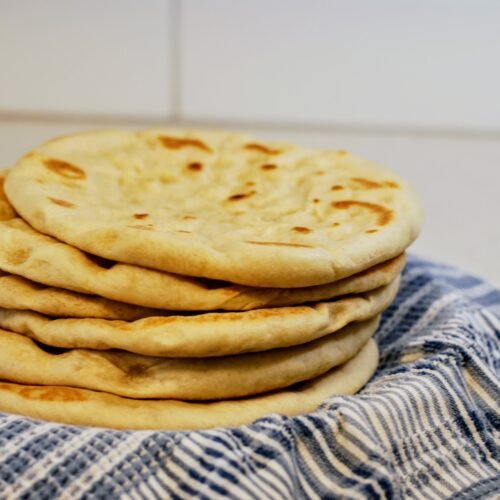
There are some store-bought foods that I simply cannot get behind, no matter how “convenient” they are. Pita bread is one of them. Don’t get me wrong—if I’m in a hurry, I’ve been known to toss a package into my grocery cart. But every time I do, I’m reminded why I usually make my own: store-bought pita is often bland, overly dense, and, occasionally, a little too sweet. Homemade pita, on the other hand, is soft, flavorful, and has that beautiful puff when it hits the pan. It’s the kind of bread you want to tear apart with your hands while it’s still warm, using it to scoop up dips or wrap around savory fillings.
The best part? Making pita at home is much simpler than most people think. Sure, it’s a little more hands-on than grabbing a bag from the store shelf, but the process is easy, budget-friendly, and incredibly rewarding. Plus, you can make a big batch and freeze the extra dough so that the next time you’re craving fresh pita, all you have to do is cook it up in minutes.
I love using these pitas for my sheet pan chicken gyros, but they also work perfectly for falafel wraps, serving alongside curries, scooping up hummus, or even as a base for quick pita pizzas.
Why You’ll Love This Recipe
- Budget-Friendly – Just a few pantry staples (flour, yeast, salt, olive oil) and water, and you’re set. You can make a dozen pitas for the price of a single store-bought pack.
- Better Texture and Flavor – Homemade pita is softer, chewier, and tastes fresher.
- Freezer-Friendly – Make once, enjoy many times. Freeze the dough balls and cook when you need them.
- No Oven Needed – These cook right on the stovetop, which is perfect for warm-weather days when you don’t want to heat up your kitchen.
Ingredients
- 4 cups all-purpose flour
- 1⅔ cups water
- 2¼ teaspoons active dry yeast (1 packet)
- 1 teaspoon salt
- 1 teaspoon sugar
- 1½ teaspoons olive oil
Instructions
1. Make the Dough
Warm your water for about 30 seconds in the microwave until it’s lukewarm—around 105℉. Stir in the sugar and yeast, then let the mixture sit for 5–10 minutes, until foamy. This step wakes up the yeast and ensures you get that lovely puff in your pitas.
Add the salt, then mix in the flour 1–2 cups at a time. Knead the dough until it becomes elastic and slightly sticky but manageable. If you’re using a stand mixer with a dough hook, let the mixer do the kneading for about 5–6 minutes. If you’re kneading by hand, expect to work it for 8–10 minutes. You may need to add a touch more flour if it’s too sticky.
Once kneaded, remove the dough from the bowl (or just peel it up from the sides if using a stand mixer), add the olive oil to coat, then return the dough to the bowl. Cover with a clean towel and let it rise until doubled in size—about 30–60 minutes.
2. Portion and Rest
Lightly flour your work surface. Divide the dough into six equal portions and roll each into a ball. Let them rest for 10–15 minutes; this relaxes the gluten, making them easier to roll out without springing back.
3. Shape and Cook
Preheat a medium-sized skillet or griddle with a lid over medium-low heat. Take one dough ball and flatten it into an 8-inch circle using your hands or a rolling pin. Press dimples into the surface of the dough with your fingertips—this helps control puffing so you get a nice, even pocket.
Lightly grease your pan with olive oil or nonstick spray. Place the dough circle in the skillet, dimple-side up, and cover. Cook for 2–3 minutes, then flip and cook the other side for 2–3 minutes. The pita should puff slightly in the middle and develop light golden spots.
While one pita is cooking, roll out the next dough ball to keep the process moving. Repeat until all dough balls are cooked.
Notes & Storage Tips
- For Best Freshness – These are incredible straight from the pan. If you want to store them, wrap cooled pitas in foil or place in an airtight container. Keep at room temperature for 1 day or refrigerate up to 3 days.
- Freezing Dough – Shape into balls, coat lightly in olive oil, and freeze in an airtight container for up to 3 months. Thaw at room temperature before rolling and cooking.
- Overnight Dough – For even more flavor, you can let the dough rise in the fridge overnight. Simply cover the bowl tightly, refrigerate, and continue with shaping and cooking the next day.
- Flavor Variations – Add 1 teaspoon garlic powder, dried herbs, or even a pinch of dill to the dough for a twist.
Serving Ideas
Here are a few of my favorite ways to enjoy homemade pita:
- With Hummus and Tzatziki – The soft texture is perfect for scooping up creamy dips.
- Stuffed with Falafel – Add lettuce, tomato, cucumber, and tahini sauce for a classic vegetarian wrap.
- As a Flatbread Base – Top with marinara, mozzarella, and basil for a quick pita pizza.
- With Curries or Stews – Tear into pieces to soak up flavorful sauces.
Final Thoughts
Once you make pita from scratch, it’s hard to go back. The process is simple, the ingredients are inexpensive, and the result is a bread that tastes far better than anything in a plastic bag. Whether you’re pairing it with a weeknight gyro, a big bowl of hummus, or using it as the foundation for a quick personal pizza, this recipe is one you’ll want to keep in your regular rotation.
So, the next time you’re tempted to grab a bag of pita at the store, consider giving this recipe a try instead. Your taste buds will thank you—and so will everyone at your table.
The Easiest Pita Recipe
Equipment
- Frying Pan with a Lid Medium sized
Ingredients
- 4 cups all-purpose flour
- 1⅔ cups water
- 2¼ teaspoons active dry yeast *1 packet
- 1 teaspoon salt
- 1 teaspoon sugar
- 1½ teaspoons olive oil
Instructions
Make the Dough
- Warm your water for about 30 seconds in the microwave until it is lukewarm (about 105℉). Add sugar and yeast and stir. Let sit for 5-10 minutes, until foamy.
- Add the salt. Then add the flour and mix 1-2 cups at a time. Knead the dough until it becomes an elastic ball that is sticky but manageable with your hands (if you're using a stand mixer, I let my mixer do all this work). You may need to add more flour so that it becomes more manageable.
- Remove your dough from the bowl (or just peel it up from the sides) and add your olive oil. It doesn't have to be exact, just enough to coat the dough. Then let your dough rise until doubled, at least 30 minutes. For overnight rising, see recipe notes.
Portion and Cook
- Lightly flour a work surface. Portion the dough into six approximately equal size balls. Let them rest for 10 to 15 minutes to make them easier to shape.
- Preheat a medium-sized pan with a lid to medium-low heat. Use your hands (or a rolling pin) to stretch a dough ball into an 8 inch circle. Then use your fingers to press dimples into the surface of the dough.
- Lightly grease your pan using olive oil or non-stick spray, and place the dough in the pan dimple-side up. Cover and cook for 2-3 minutes on each side. Meanwhile, take another dough ball and repeat the previos step.
- Repeat the process until no more dough balls remain. Enjoy!
Notes
- For Best Freshness – These are incredible straight from the pan. If you want to store them, wrap cooled pitas in foil or place in an airtight container. Keep at room temperature for 1 day or refrigerate up to 3 days.
- Freezing Dough – Shape into balls, coat lightly in olive oil, and freeze in an airtight container for up to 3 months. Thaw at room temperature before rolling and cooking.
- Overnight Dough – For even more flavor, you can let the dough rise in the fridge overnight. Simply cover the bowl tightly, refrigerate, and continue with shaping and cooking the next day.


Leave a Reply